
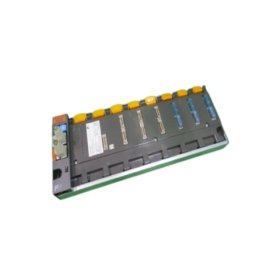
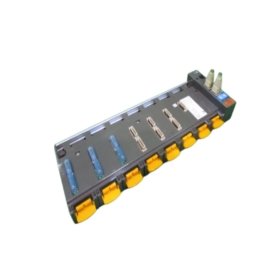
The Fuji NP1BS-08S serves as a mounting backbone for I/O modules. This base board simplifies system assembly inside control cabinets. It holds up to eight expansion units securely. Users can replace individual modules without rewiring the entire setup.
Detailed Technical Specifications
| Parameter | Specification |
|---|---|
| Dimensions (W x H x D) | 240 mm x 110 mm x 45 mm |
| Weight | 0.65 kg |
| Number of Module Slots | 8 slots |
| Internal Bus Interface | 24V DC differential signal |
| Bus Connector Type | 16-pin spring clamp |
| Energy Storage | None (passive board) |
| Operating Voltage | 5V DC from backplane |
| Current Consumption | 0.1 A maximum |
| Mounting Method | Screw fixation or DIN rail |
| Material | Flame-retardant plastic |
Physical Layout and Connector Details
The Fuji NP1BS-08S measures 240 millimeters in width. Its total weight reaches 0.65 kilograms for stable mounting. Eight slots accept standard Fuji NP1 series modules. Each slot has a dedicated 16‑pin spring clamp connector. A locking mechanism secures every module firmly in place. The board uses a passive design without onboard energy storage.
Installation and System Integration
Mount this base board horizontally inside your control panel. Use either DIN rail clips or M4 screws for fixation. Then insert your I/O modules from left to right sequentially. The backplane automatically provides 5V power to each slot. Consequently, you do not need separate power wiring per module. For larger systems, connect multiple base boards via extension cables.
Compatibility and Application Notes
This base board works exclusively with NP1 series digital and analog modules. It does not support high‑power output cards directly. Therefore, use external relays for heavy loads. The passive design generates no additional heat. This feature allows dense module packing in small cabinets. Many engineers choose this board for distributed control systems.
Maintenance and Module Replacement
Always power down the system before removing any module. Then press the release latch on the target unit. Pull the module straight out from its slot. Insert the new unit until you hear a click. Finally, restore power and verify proper communication.


 and reliable performance. It measures up to 10,000 RPM, with IP67 protection.")


 Analog I/O Module")


WeChat
Scan the QR Code with wechat